|
User’s Guide
|
|

|
Instant HR
Instant Leave
Instant FMLA
Instant Self Serve
|
|
Apex Business Software
● www.ihrsoftware.net
|
|
Swift. Simple. Secure.
|
|
The Power .
To Manage
|
Table of Contents
1. Getting Started.. 5
1.1. System Requirements. 5
1.2. Single Computer Installation.. 5
1.3. Additional Client Installation.. 5
1.4. Client/Server Installation.. 6
1.5. Instant Self Serve Installation.. 6
1.6. Moving the Database. 6
2. Company Setup Wizard.. 7
3. Employees.. 8
3.1. Listing, Opening and Adding Employees. 8
3.2. Entering Employee Information.. 9
3.3. File Folders. 10
3.4. Best Practices for Managing Employee Information.. 10
4. Leave. 12
4.1. Setting Up Leave. 12
4.2. Types of Leave. 12
4.3. Leave Accrual Plans. 13
4.4. Entering Leave. 17
4.5. Leave FAQ.. 18
4.6. FMLA Considerations. 18
5. Timecards and Projects.. 21
6. Position Control and Compensation.. 22
7. Benefits.. 23
7.1. Adding Benefits. 23
7.2. Employee Benefit Enrollment Setup. 24
7.3. Employee Benefit Enrollment Tab.. 26
7.4. COBRA.. 26
7.5. Benefits Reports. 27
7.6. Best Practices for Managing Benefits. 27
8. Reports.. 28
9. Mail Merge. 33
10. Tasks and Reminders.. 34
10.1. Tasks. 34
10.2. Managing Tasks. 34
10.3. Automatically-Generated Reminders. 34
10.4. Best Practices for Managing Tasks and Reminders. 36
11. Exporting Information.. 37
11.1. Default Export Interfaces. 37
11.2. Customizing Export Interfaces. 37
11.3. Directly Querying the Database. 38
12. Security.. 39
12.1. Users, Groups and Roles. 39
12.2. Effective Permissions. 41
12.3. Permission Scopes. 41
12.4. FAQ.. 42
12.5. Other Security Considerations. 42
12.6. Best Practices for Security.. 43
13. Backing Up and Restoring.. 44
13.1. How to Automatically Back Up the HR Database. 44
13.2. Security Considerations. 45
13.3. Restoring a Backup. 45
Table of Figures
Figure 1. Company Setup Wizard.. 7
Figure 2. Employee Window... 8
Figure 3. Setting up Employee Folders. 10
Figure 4. Types of Leave Window... 12
Figure 5. Type of Leave Window... 12
Figure 6. Leave Accrual Plans. 13
Figure 7. Leave Accrual Plan -- 10VAC/15@5yrs 2SIC.. 14
Figure 8. Example 1:LAP – 15VAC 2SIC.. 14
Figure 9. Example 2:LAP – 10VAC@6mos 2PER.. 15
Figure 10. Example 3:LAP – 8.5PTO@3mos. 15
Figure 11. Example 4:LAP – 10VAC@3mos/1FLT.. 16
Figure 12. Leave Accrual for Employee. 16
Figure 13. Advanced Accrual for One Employee. 17
Figure 14. Accrual for Extended Leave. 17
Figure 15. Leave of Absence. 17
Figure 16. Insurance Benefit.. 23
Figure 17. TDRP Benefit.. 24
Figure 18. Insurance Enrollment Matrix.. 24
Figure 19. Employee Benefit Screen.. 25
Figure 20. TDRP Enrollment Matrix.. 25
Figure 21. Employee TDRP Enrollment Screen.. 26
Figure 22. Employee Benefit Enrollment Tab.. 26
Figure 23 COBRA.. 27
Figure 24. Save/E-mail Report Menu Item... 28
Figure 25. Mail Merge Tools. 33
Figure 26. Insert Merge Fields in MS Word.. 33
Figure 27. Task.. 34
Figure 28. Export Interfaces. 38
Figure 29. Export Interface. 38
Figure 30. Permissions for Users, Groups and Roles. 39
Figure 31. SQL Role Membership. 41
Figure 32. Permissions on Leave Data Entry.. 41
Figure 33. Restoring a Database with Enterprise
Manager.. 46
Figure 34. Restore Database Window... 46
Figure 35. Restore Database Options. 46
Tables
Table 1. System Requirements for Single Computer Installation.. 5
Table 2. What Makes Apex Software Different?. 7
Table 3. Information on Employee’s General Tab.. 9
Table 4. Employee Tabs. 9
Table 5. Large Pay Table. 22
Table 6. Small Pay Table. 22
Table 7. Insurance Benefit Fields. 23
Table 8. TDRP Benefit Fields. 24
Table 9. Fields for Employee Benefit Enrollment.. 25
Table 10 Benefits Reports. 27
Table 11. Reports Opened by Clicking Reports on Main
Menu.. 28
Table 12. Reports Opened by Clicking Reports→Employee
Detail. 29
Table 13. Reports Opened by Clicking
Reports→Compensation.. 29
Table 14. Reports Opened by Clicking Reports→Employment.. 29
Table 15. Reports Opened by Clicking
Reports→Benefits. 30
Table 16. Reports Opened by Clicking
Reports→Leave Lists and Calendars. 30
Table 17. Reports Opened by Clicking
Reports→Leave Summaries. 30
Table 18. Reports Opened by Clicking
Reports→Lost Time Analysis. 31
Table 19. Reports Opened by Clicking
Reports→Timecards. 31
Table 20. Reports Opened by Clicking
Reports→Certifications. 31
Table 21. Reports Opened by Clicking
Reports→Training.. 31
Table 22. Reports Opened by Clicking
Reports→Birthdays. 31
Table 23. Reports Opened by Clicking
Reports→Scheduled Performance Reviews. 31
Table 24. Minor Reports Opened by Clicking
Reports→Seniority Anniversaries. 32
Table 25. Fields in a Task.. 34
Table 26. Reminders Regarding Benefits. 35
Table 27. Reminders Regarding Leave. 35
Table 28. Reminders Regarding Fields on Reviews Tab
and Certifications Tab.. 35
Table 29. Reminders Regarding Immigration, Driver,
and Personal Fields. 35
Table 30. Reminders Regarding Leave and FMLA.. 36
Table 31. Reminders Regarding COBRA.. 36
Table 32. Default Export Interfaces. 37
Table 33. Selected Views. 38
Table 34. Security Terms. 39
Table 35. Common SQL Roles. 40
Table 36. Build-in SQL Roles. 40
Table 37. Built-in SQL Users. 40
Table 38. Effective Permissions Example. 41
This document is written for both end users and
administrators. Administrators should read this section to plan the
installation. To schedule backups, read Section 13 on page 44. End users, read Section 2 on page 7 to begin the setup process.
The software includes a database and a client component.
Both the database and the client can be installed on a single computer. Both require
Windows 98SE or better, but work best with Windows XP Pro or better. Both work
best with at least 256M of memory. The client requires a monitor resolution of
at least 1024x768, but works best with 1200x800. Table 1 summarizes these requirements.
Table 1. System Requirements for Single Computer Installation
|
Requirement
|
Minimum
|
Recommended
|
|
Operating System
|
Windows 98SE
|
XP Pro SP2
|
|
Screen Resolution
|
1024x768
|
1200x800
|
|
Free Hard Drive Space
|
250M
|
250M
|
|
System Memory/RAM
|
128M
|
256M
|
For client/server installations, the minimum configuration
for the server is Windows 98SE with the desktop edition of SQL Server, MSDE.
The typical server configuration is Windows Server 2000/2003 with SQL Server
2000/2005. The Instant Self Serve (ISS) Web Add-on requires Internet
Information Services. See Section 1.5 for ISS installation instructions.
To install everything on one computer, double-click setup.exe.
The installer will open. Click Typical Installation. The installer will
install the following components:
- Microsoft
SQL Server Data Engine (MSDE)
- Microsoft
.NET Framework 1.1
- IHR
SQL Server Database
- Client software
To install the software on an additional computer within
your network, run the installer on the other computer and click Additional Client
Installation. After installation completes, the software will open. When
prompted to logon, enter the name of the computer that is hosting the database.
Client/server installations involve installing the database
on a server computer and then installing client software on all the computers
that need to access the database. If your organization is not already running SQL Server 2000 or
2005 then run the installer and click Server Installation.
Otherwise, if your organization is running SQL Server
then use Enterprise
Manager to restore the database located in the setup folder at Database/iHR.bak. When prompted, name
the database IHR. For
step-by-step instructions on how to use Enterprise Manager read “Restoring a
Database with SQL Server 2000’s Enterprise Manager” on page 45.
If you purchased the Instant Self Serve Web Add-on then copy
the Web Project files from the Instant Self Serve installation folder
to your Web server. Your Web server should be running either Windows XP Pro or
Windows Server and Internet Information Services (IIS) 5 or better. IIS 5
requires the installation of ASP.NET which can be downloaded for free from
Microsoft’s website.
If you need to move the database to a different server then
follow the procedure below:
- Backup the database by opening the client software and
clicking File→Backup.
- Move the backup file to your new server.
- If SQL Server 2000 or better is not already running on
the server then install MSDE.
- Restore the database by following the Restoring a Backup instructions on page 45.
- Uninstall SQL Server from the original host
computer. To completely remove SQL Server’s footprint, delete C:\Program
Files\Microsoft SQL Server.
|
Use the Company Setup Wizard to set up your
company. If the wizard is not already open then click Company→Company
Setup Wizard.
A window similar to Figure 1 will open. Use the wizard to set up you company, define types of leave, set up accrual plans, and enroll sample employees in those plans.
The wizard will ask you if you want to delete all of the
sample employees, and it can import your current employees from a CSV file.
To import employees without running the Company Setup Wizard,
click Employees→Import Employees. To change company
settings after you complete the wizard, click Company→Company
Settings.
|
Figure
1. Company Setup Wizard

|
After setting up your company, you can explore what makes
this software different from typical HR and time & attendance software. See
the table below.
Table 2. What Makes Apex
Software Different?
|
Feature
|
Explanation
|
|
File Attachments
|
Attaching files like
reviews, e-mails, and scanned-in medical certifications is easy. Learn more
by reading section 3.3 on page 10
|
|
Mail Merge
|
Set up form. After
that initial time investment, creating benefit notifications, FMLA forms, and
leave confirmations is effortless. Chapter 9 on page 33 explains Mail Merge.
|
|
Vacation and PTO Accrual
|
The software will
automatically bump up people’s accrual for you, based on seniority. Chapter 4 on page 12 explains leave accrual.
|
|
FMLA & CFRA Management
|
Both paid and unpaid leave
can run concurrently with any type of family leave, STD, LTD or work comp.
Learn more by reading Chapter 4.
|
|
E-mailed Reminders
|
The software will e-mail
reminders to employees, HR, and management regarding expiring certifications
and licensing. Chapter 10 on page 34 explains tasks and reminders.
|
|
Simplification
|
The company settings
allow you to turn off sections of the software. If you do not need to track
timecards, succession planning or union membership then click Company→Company Settings and uncheck the features that
you do not need.
|
This chapter explains how to list, open and add employees.
It also explains most of the employee information, file folders and best
practices. This chapter does not explain leave, benefits, reports or security.
Each of those topics merits its own chapter and can be found on pages 12, 23, 23 and 39.
The People Explorer lists employees. To open the People Explorer,
click View→People Explorer on the main menu. Select Active
Employees. To open an employee, double-click him. A window similar to Figure
2 will open.
Custom
Tabular Reports also list employees. These views allow you to
enter information about several employees at once. To open a view, click Employees→Custom
Tabular Reports.
People
Search searches for an employee based on name, date of birth, or
social security number. To use People Search, click Employees→People
Search. Double-click an employee to open him.
To add an employee, click Employees→Add Employee.
A window asking for the name of the employee will open. Once you click save,
the system will create the employee and open a window similar to Figure 2. You can then edit the new employee’s information.
Figure 2. Employee Window
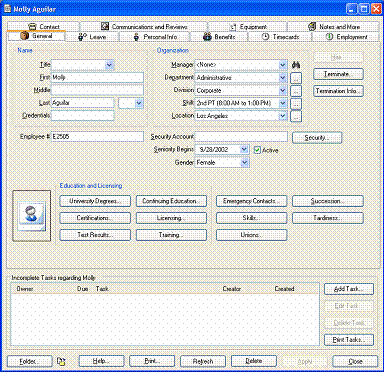
After you open an employee, you will see a window similar to
Figure 2. Table 3 explains all of the buttons shown in Figure 2. Table 4 explains the tabs. The system raises reminders based on the information in those tabs. Table 28 and Table 29 on page 35 explain those reminders.
Table 3. Information on Employee’s General Tab
|
Control
in Figure 2
|
Contents
|
|
Organization
|
Shows an employee’s manager,
department, division, shift, location, current position and past positions
within the company. To add a department, division, shift or location to the
list of possibilities, click the button labeled “…”. Note that you can change
“division” to “company” or “subdepartment” by clicking Company→Settings and changing the entry for the secondary
organizational class.
|
|
Degrees
|
University degrees
include years completed, location, GPA, and verification.
|
|
Continuing Ed
|
Continuing education
includes credits, date completed, location, course, grade, and verification.
|
|
Certifications
|
Certifications include
date completed, date renewed, expiry, and verification.
|
|
Licensing
|
Licensing includes
state / jurisdiction, dates completed and renewed, and verification.
|
|
Test Results
|
Test results include
test, date, and score
|
|
Training
|
Training includes
course and dates began & completed. To record training for a group of
employees, click Employees→Record Group Training
|
|
Skills
|
Skills include a
description and level
|
|
Unions
|
Unions include a
description and date joined
|
|
Succession
|
If your organization
implements career planning then use succession planning.
|
|
Tardiness
|
Tardiness records
individual incidents and whether or not they were excused.
|
|
Emergency Contacts
|
Lists contact
information for emergency contacts.
|
Table 4. Employee Tabs
|
Control
in Figure 2
|
Contents
|
|
Communications &
Reviews
|
Displays when the next
review is scheduled and when, if ever, the last review occurred. It also
lists all the reviews. The Next Review field raises a Review Due reminder. Table 28 explains similiar reminders. To enable or disable the reminders click Company→Settings and then click the Reminders tab. Also displays all
warnings, reprimands and communications regarding an employee.
|
|
Leave
|
Tracks detailed leave
history and summarizes usage & availability as of today.
|
|
Personal Info
|
Shows an employee’s
date of birth, social security number, race, marital status, dependents,
health status,
spouse, children, immigration, military experience and driver’s license
information. Table 29 explains related reminders.
|
|
Benefits
|
Shows individual
enrollment in each benefit and also tracks COBRA. To rename benefits or enter
premium tables, click Benefits
on the main menu.
|
|
Timecards
|
Tracks an individual’s
timecard entries. To enter timecards for several employees at once click Timecards on the main menu.
|
|
Employment
|
Shows a complete
salary and rehire history. Add a new entry whenever an employee’s status or
pay changes. Each entry tracks employment status, pay, position status, and
bonus ranges. This tab also contains new hire and exit checklists.
|
|
Communications
|
Displays warnings,
reprimands and communications regarding an employee.
|
|
Contact
|
Home and work contact
information.
|
|
Equipment
|
Lists the equipment an
employee has checked out. Allows you to easily check his equipment back in.
|
|
Notes and More
|
Use this tab to create
custom fields and enter narratives that do not fall under communications or
tasks.
|
The system automatically creates a folder for each employee.
Within each folder, you can store MS Word resumes, scanned-in vacation
requests, scanned-in review forms, and everything else that you can save to
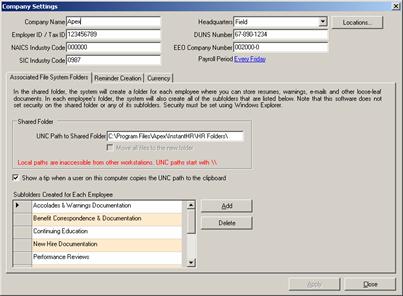
disk or scan in. To change the root folder, click Company→Settings.
A window similar to Figure 3 on the next page will open. Look in the Associated File System
Folders tab. Change the path to a shared folder on your network.
|
Whenever the system creates a folder for an employee, it
creates a shortcut and several subfolders. In Company Settings, change the
subfolders to meet your needs.
To open an employee’s folder, take any of the actions
listed below.
- Right-click the employee in People Explorer.
- Navigate to the root shared folder and click the
employee’s shortcut.
- Open the employee and click Folder.
|
Figure
3. Setting up Employee Folders
|
To open the root shared folder, either click Employees→HR
Folder or click the Open HR Folder toolbar button  . You can also open the root folder with Windows Explorer.
When the system creates folders, it does not secure them.
Typically, you will set permission on the root folder so that only HR staff and
proprietors can access employee folders. For more advanced scenarios, like
granting access to managers on all or part of an employee’s folder,
administrators can use Windows Explorer to set permissions on individual
folders. Consult Windows
Help for more information about file system security.
Apex recommends the following practices:
Designate equipment and track its location or user. To list
and add equipment, click Company→Equipment on the main menu. To
assign equipment to an employee, open him and click the Equipment
tab.
Enter the skills, tests and training that are important to
your organization. To list and add these items, click Company on the
main menu. To associate skills, tests, and training with an employee, open the
employee and click the Skills and Unions or Tests and Training tab.
When an employee’s status changes, open the employee and
document the change in her employment tab. A new entry should be entered into
the employment tab whenever the employee is rehired, promoted or demoted.
Store copies of reviews, resumes and other written
documentation in the employee folders. Read page 9 to learn about employee folders.
This chapter explains how to set up leave. It then explains types
of leave, leave accrual, how to enter used leave, frequently asked questions,
and FMLA considerations. Reports are described in Table 16 on page 30.
The Company Setup Wizard provides step by step procedures
that assist administrators in setting up leave, and you can open it by clicking
Company→Setup Wizard. After you run the Wizard, you can further
set up leave by opening the leave setup window. Click Leave→Setup Up
Leave.
Use the Set Up Leave window to define the types of leave
that you need to track, create the leave accrual plans that define how much
employees accrue and when they accrue it, and set the initial balances for each
employee/type.
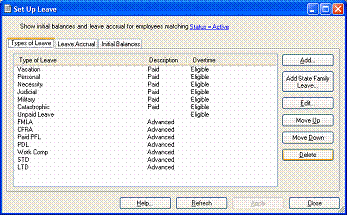
To edit the list of types, open the Set Up Leave
window that is shown in Figure 4. Click the Move Up and Move Down buttons to change the order that the types are listed.
|
Figure 4. Types of Leave Window
|
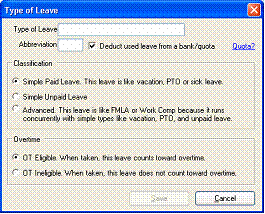
Figure
5. Type of Leave Window
|
To open the window shown in Figure 5, click the Add button. That window contains several fields. The Abbreviation field is shown in summary reports where space is a premium. The classification controls whether the leave is treated as simple or
advanced. Examples of advanced types of leave include FMLA, CFRA, Work Comp and
LTD. They run concurrently with simple types like vacation and PTO. Simple
leave is classified as paid or unpaid and OT eligible or OT ineligible. After
all the types of leave are defined the leave accrual plans can be created.
Click the Add State Family Leave button to add
advanced types of leave for a state. Clicking that button will add the types
and modify the existing leave accrual plans. If you are only interested in
tracking Federal and state leave then you only need to enter one or two simple
types of leave like paid and unpaid; you do not need types for vacation or PTO.
Leave
Accrual Plans define how much leave employees accrue and how
often they accrue it. Each plan answers four questions for each type of accrued
leave:
- Hours. How many hours of leave should participating
employees accrue?
- Frequency. When should the system credit the accrued
leave?
- Limits. What are the maximum hours of unused leave that
participating employees can accrue?
- Enforcement. When should the system apply the limits?
|
Create a Leave Accrual Plan for each group of
employees that accrue leave at a unique rate. For example, if administrative
assistants accrue 4 vacation hours monthly and everyone else accrues 6 hours
then you would create two plans. If part time assistants accrue 2 vacation
hours then you would create a third plan.
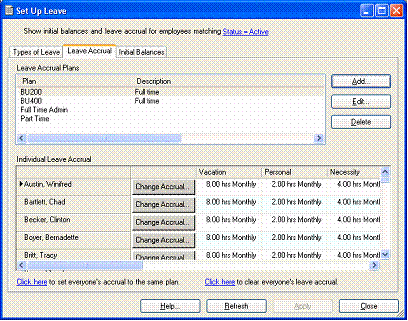
To list plans and create them, click Leave→Set Up
Leave and then click the Leave Accrual tab as shown in Figure 6. After the plans are created, click the Change Accrual buttons
and Click here
links to enroll employees in the plans.
|
Figure
6. Leave Accrual Plans
|
The next section lists example leave accrual plans. To learn
more about enrolling employees in the plans, read Section 4.3.2 below on page 16.
4.3.1. Leave Accrual Plans
|
To set an accrual rate, click a cell in the table and then
enter the hours accrued and the frequency. In Figure 7, the cell that reads, “16.00 hrs Seniority Anniversary III” specifies that employees who are assigned to this plan accrue 16 hrs of sick leave each year. The cell that reads, “10.00 hrs Every Month of Seniority IV”
specifies that employees who are assigned to this plan – and who have been
employed for 5 years – accrue 10 hrs of vacation every month of seniority.
When choosing frequency, you can choose from seven
options: weekly, biweekly, semimonthly, monthly, bimonthly, semiannually and
annually. Each of those frequencies offer variations like “Seniority
Anniversary III” and “Seniority Anniversary IV” that determine when leave is
first credited.
|
Figure
7. Leave Accrual Plan -- 10VAC/15@5yrs 2SIC
|
.
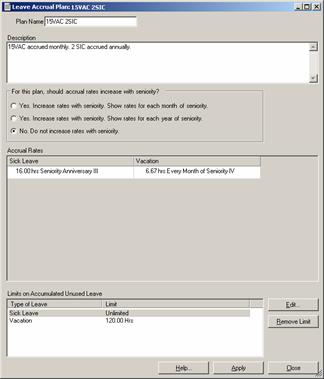
Figure 8 shows a plan that accrues 16 hrs of sick leave annually and 10 hrs of vacation monthly. In this example, sick leave is not limited and vacation is limited to 120 hrs.
|
Figure
8. Example 1:LAP – 15VAC 2SIC
|
|
Figure 9 shows a plan that accrues nothing for the first 6 months of employment. After 6 months, it accrues 16 hrs of personal leave annually and 6.67 hrs of vacation monthly.
|
Figure
9. Example 2:LAP – 10VAC@6mos 2PER
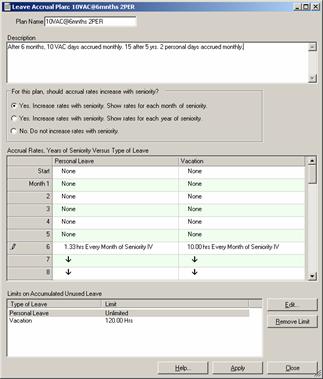
|
|
Figure 10 shows a plan that accrues nothing for the first 3 months of employment. After 3 months, it accrues 2 hrs of PTO every Friday.
|
Figure
10. Example 3:LAP – 8.5PTO@3mos
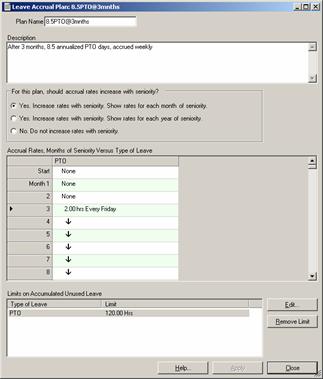
|
|
Figure 11 shows a plan that accrues 1 floating holiday each year. After 3 months, it accrues 6.67 hrs of vacation on the first day of each month.
|
Figure
11. Example 4:LAP – 10VAC@3mos/1FLT
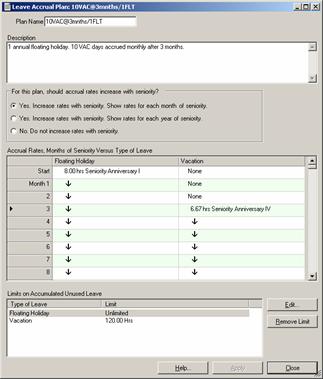
|
After you create the Leave Accrual Plans, you are ready to
enroll employees in the plans.
To start accruing leave for an employee, enroll him in a Leave Accrual Plan.
The software provides two ways to enroll employees.
- Enroll an individual by opening him, clicking his Leave
tab, and clicking the Change Accrual button near the bottom-right
corner of the window.
- Leave→Set Up Leave, click the Leave
Accrual tab, and then click either the Change Accrual buttons
next to each employee or the Click here links.
|
After clicking the Change Accrual button, the
window in Figure 12 will open. Usually, an employee is only enrolled in one accrual plan. But if your company’s accrual policy changes, or if the employee goes on extended leave, then you can enroll one employee in many plans.
|
Figure
12. Leave Accrual for Employee
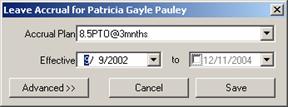
|
|
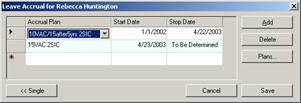
When you click the Advanced button in the window
shown above then you will see something similar to Figure 13. Note that a plan takes effect between Start Date
and Stop Date.
Also note that only one plan can be in effect at one time. Figure 13 shows an employee who originally accrued 10 days of vacation, but, on 4/23, he began accruing 15 days.
|
Figure
13. Advanced Accrual for One Employee
|
|
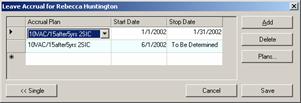
Figure 14 shows the enrollment for an employee who went on extended leave on 2/1/2002 and returned 6/1/2002. She will not accumulate leave between 2/1/2002 and 5/31/2002.
|
Figure
14. Accrual for Extended Leave
|
Leave can be entered as a single adjustment or itemized
day-by-day. Use adjustments to set initial balances and comp credits. To enter
an adjustment, click Leave→Enter Adjustment. To itemize leave
day-by-day, click Leave→Schedule Leave of Absence and use the
window in Figure 15.
Figure 15. Leave of Absence

In Figure 15, select the departing employee. To check availability and eligibility, click the Totals and Procedures tab. Once you determine availability, return to the General tab. To enter a range of days, click
the From To button. To run the leave concurrently with an advanced type
like FMLA, check the advanced types in the list labeled Also count this
leave as. To schedule tasks related to the leave of absence, click the Create
New Tasks tab. To mail merge a form letter, click the Write Letter
button.
|
Q:
A:
|
How do I check how much leave is available?
To check available leave for one employee, click Leave→Leave
for One Employee.
|
|
Q:
A:
|
What is the difference between available leave and
accumulated leave?
Employees may accumulate more leave than they actually
have available. For example, as of today an employee may have accumulated 8
vacation days, but, because he already scheduled 3 days, he only has 5 days
available. Available leave is a function of accumulated leave, future earned
leave, future scheduled leave, and future limits.
|
|
Q:
A:
|
How do I schedule leave?
Click Leave→Schedule Leave of Absence.
|
|
Q:
A:
|
How do I see how much leave was used during the last
payroll?
Click Reports→Used Leave Summary, Employee Vs
Type of Leave. Select the payroll period and run the report. The report
will sum each type of leave for each employee.
|
|
Q:
|
How do I prevent an employee from accumulating leave while
he is on FMLA or extended leave?
|
|
A:
|
Open the employee and click his leave tab. Click the Change
Accrual button near the bottom right of the window. You will see a line
that reads “Effective [some date] to [today]”. Check the checkbox next to
today’s date and select the date of departure.
|
FMLA and state family leave is accrued the same way as any
other type of leave, by specifying a rate and period in the leave accrual plans.
To add types of family leave, read Section 4.2. To set accrual rates for those types, read Section 4.3.
4.6.1. Editing / Extending Family Leave
Once FMLA has been entered, it can be accessed by either
opening the employee, clicking Leave→Leave for One Employee, or
clicking Leave→Leave Matrix and finding the request in the list.
After you open the leave of absence, you can extend it by clicking the button
labeled From To. You can cut the leave short by scrolling down to the
day that the employee returned/will return and deleting it. The software will
then ask if you want to delete everything thereafter. Click yes.
4.6.2. FMLA Forms
Apex provides five FMLA forms: Request for FMLA Leave,
Medical Provider Certification of Serious Health Condition, Medical Provider
Recertification of Serious Health Condition, Approval of Request for FMLA
Leave, Denial of Request for FMLA Leave, and Medical Provider Certification of
Fitness for Duty. Customize these forms to meet your needs or take your
existing forms and prepare them for mail merging. To merge employee information
with a form, click Leave→Mail Merge on the main menu. Read “Mail
Merge” on page 33 for more information.
4.6.3. Best Practices for Managing FMLA
Apex recommends the following best practices.
Accrue FMLA leave continuously instead of by calendar year. Instant
FMLA does not support accruing FMLA by calendar year because doing so doubles
your company’s exposure to abuse and misuse. Given that an employee is only
allowed 12 weeks annually of FMLA leave, if you accrue FMLA leave by calendar
year then you are allowing employees twice as much leave as is required; you
are allowing 12 weeks for the last half of last year plus 12 weeks for the
first half of this year for a total of 24 weeks over the last continuous year.
Describe FMLA benefits in the policy manual that you give to
your employees. Failing to generally inform eligible employees of their FMLA
benefits is punishable by a $100 per incident fine by the Department of Labor.
As soon as a qualified employee requests FMLA leave,
immediately send two letters to the employee, one letter that requests medical
certification and another letter that approves the leave contingent on medical
certification and explains his FMLA benefits. The employer must respond to an
FMLA request within two business days otherwise the employer cannot legally
deny the request. The employee must deliver the certification to the employer
within 15 days of his receipt of the employer’s request. If the employee can
prove that he made a “good faith” effort to deliver the certification but was
unable to do so then he may deliver it within 30 days. If he fails to deliver
the certification within 15 or 30 days then you can deny or revoke his FMLA
request. If he is already on leave then you can treat him as absent without
leave, require that he retroactively take paid leave, or terminate his
employment.
After the initial medical certification, consider requiring
medical recertification every 30 days for pregnancy, chronic conditions, or
long-term conditions. Although legally the employer must pay for the
recertification (Code of Federal Regulations, Title 5, Volume 1, Section 630.1207,
Paragraph j), in practice employees usually ask their provider to complete the
certification during a scheduled appointment, and few employers offer to pay.
For other serious conditions, including intermittent conditions, the employer
may require recertification on a periodic basis, but not before the minimum
duration of the period of incapacity. If the employee asks to extend FMLA leave
or the employer can prove that it received information that casts doubt on the
original request then the employer may require medical recertification as often
as is “reasonable”. (Thirty days would likely always be considered reasonable.)
Exercising this right can greatly reduce FMLA abuse. In the FMLA window, if you
enter the Recertification
Period then the system will raise a reminder.
If you question a medical provider’s certification then
direct the employee or his family member to a provider of your choice and pay
for a second opinion. As long as you pay for the opinion and you do not employ
the provider, federal law gives you the right to require a second opinion. If
the second opinion differs from the original certification then you can pay for
and obtain a third opinion from a provider that you select. That third opinion
is binding for both you and the employee.
Consider requiring a physician’s note when an employee
exercises intermittent FMLA leave. If an employee secures a medical
certification for intermittent leave with a generic diagnosis like depression,
migraines, or stress then you can lessen FMLA abuse and misuse by requiring the
employee to obtain and submit a doctor’s note every time he takes FMLA leave.
When an employee asks to extend his approved FMLA leave, click
Leave→Schedule / Check Available FMLA and test his qualification. If
he has not worked at least 1,250 hours during the last twelve months then he
does not qualify for any additional leave.
Train HR personnel and managers to recognize qualifying
events. Request a medical certification and send an approval letter even if the
employee does not request FMLA leave. Legally, it is the employer’s
responsibility to grant FMLA benefits regardless of whether or not the employee
asks for them. Consider a male employee who asks his supervisor for time off
because his wife is scheduled to deliver his child, but the employee does not
know to ask for FMLA leave. If the employee’s supervisor denies his request
then the employer is open to fines by the Employment Standards Administration of
the Department of Labor and civil action by the employee. The supervisor should
require that the employee fill out a request for FMLA leave, request medical
certification, and send him a letter that formally accepts the request,
contingent upon medical certification.
Timecards are flexible. They can show a variety of fields
including In Time/Out Time or Date/Hours. They can be logged against projects.
They can be immediately accepted or marked pending until they are reviewed and
approved.
You should see a Timecards entry on the main menu. If
you do not see it then click Company→Company Settings and put a
check beside the timecards and/or projects features. The Time & Projects
tab in the Company
Settings window defines the default timecard layout, or schema,
for new employees. It also allows you to rename “Project” to something like
“Job”, “Visit” or “Service”.
To select the fields that will show on timecards, click Timecards→Schemas.
You will see a list of schemas such as “Date/Hours” and “Factory Floor”.
Different employees can use different schemas. Your billable employees may
record time using one schema { Date, Hours, Project } while your non-billable
employees record time using another schema { In Time, Out Time }.
If you need to track time against projects or jobs then
click Projects→List on the main menu. You can then add projects.
Projects can be grouped into classes. A class can be anything including Payers’
name, office locations, and cost center codes.
After you define your timecard schemas you are ready to
enter time. The Instant
Self Serve Web add-on allows employees to clock in/out over the
Internet and submit their timecards online. To use the client to enter
timecards, either click Timecards→Enter Timecards for Many Employees
or click Timecards→Enter/Edit Timecards for One Employee.
If you choose a timecard schema that requires manager
approval then new entries will be recorded as pending. To approve them, click Timecards→Enter
Timecards for Many Employees and choose Review pending entries when
prompted.
To run timecard reports, click Reports→Timecards.
The “Timecard Summary for Payroll” report is the most useful. All of the
reports are described in Section 7.
Position control allows you to enter standard positions,
group the positions into common pay grades, and assign pay steps to each pay
grade. All of the settings for pay grades are under the Position→Pay
Tables menu item. All of the reports for compensation and pay tables are
under the Reports→Compensation menu item.
Instant HR supports military-style pay tables. The Army
releases a pay table called the General Schedule which lists the pay grades as
rows and the pay steps as columns. The pay table in Table 25 approximates the Army’s General Schedule. Positions are assigned to one pay grade. For example, a Private is a GS-1 (General Schedule, 1st pay grade). You can see from the table that a Private can earn
between $16352 and $20450 depending on his pay step. A General is a GS-15 and
can earn between $91507 and $118957. Note that more than one position can use
the same pay grade. An Admiral might also be a GS-15.
Table
5. Large Pay Table
|
Grade
|
Step 1
|
Step 2
|
Step 3
|
Step 4
|
Step 5
|
Step 6
|
Step 7
|
Step 8
|
Step 9
|
Step 10
|
|
1
|
16352
|
16898
|
17442
|
17983
|
18527
|
18847
|
19383
|
19925
|
19947
|
20450
|
|
2
|
18385
|
18822
|
19431
|
19947
|
20169
|
20762
|
21355
|
21948
|
22541
|
23134
|
|
3
|
20060
|
20729
|
21398
|
22067
|
22736
|
23405
|
24074
|
24743
|
25412
|
26081
|
|
4
|
22519
|
23270
|
24021
|
24772
|
25523
|
26274
|
27025
|
27776
|
28527
|
29278
|
|
5
|
25195
|
26035
|
26875
|
27715
|
28555
|
29395
|
30235
|
31075
|
31915
|
32755
|
|
6
|
28085
|
29021
|
29957
|
30893
|
31829
|
32765
|
33701
|
34637
|
35573
|
36509
|
|
7
|
31209
|
32249
|
33289
|
34329
|
35369
|
36409
|
37449
|
38489
|
39529
|
40569
|
|
8
|
34563
|
35715
|
36867
|
38019
|
39171
|
40323
|
41475
|
42627
|
43779
|
44931
|
|
9
|
38175
|
39448
|
40721
|
41994
|
43267
|
44540
|
45813
|
47086
|
48359
|
49632
|
|
10
|
42040
|
43441
|
44842
|
46243
|
47644
|
49045
|
50446
|
51847
|
53248
|
54649
|
|
11
|
46189
|
47729
|
49269
|
50809
|
52349
|
53889
|
55429
|
56969
|
58509
|
60049
|
|
12
|
55360
|
57205
|
59050
|
60895
|
62740
|
64585
|
66430
|
68275
|
70120
|
71965
|
|
13
|
65832
|
68026
|
70220
|
72414
|
74608
|
76802
|
78996
|
81190
|
83384
|
85578
|
|
14
|
77793
|
80386
|
82979
|
85572
|
88165
|
90758
|
93351
|
95944
|
98537
|
101130
|
|
15
|
91507
|
94557
|
97607
|
100657
|
103707
|
106757
|
109807
|
112857
|
115907
|
118957
|
|
For large organizations, pay tables simplify salary
negotiations and pay increases. For other organizations, pay is often
negotiated on an individual basis and salaries do not fall into a clearly
defined table. In that case, create a pay grade for each position and create
pay steps for minimum, typical, and maximum pay as shown in Table 26.
|
Table
6. Small Pay Table
|
Grade
|
Min
|
Typical
|
Max
|
|
Clerical
|
16352
|
16898
|
17442
|
|
Staff
|
18385
|
18822
|
19431
|
|
Manager
|
20060
|
20729
|
21398
|
|
Director
|
22519
|
23270
|
24021
|
|
Partner
|
25195
|
26035
|
26875
|
|
Once you define your pay table(s), create positions and
assign each position to the correct pay grade. When entering actual pay for an
individual, you are not restricted to pay tables. You can look up salary by pay
grade/step, or you enter an unrelated amount. To use the position and
compensation reports, click Reports→Compensation.
Instant HR supports insurance benefits and tax-deferred
retirement plans (TDRPs). Insurance benefits include health, accidental death,
and dental. TDRPs include 401(k)s and 403(b)s. For companies with more than
twenty employees, Instant HR also tracks COBRA. This chapter explains how to
modify insurance benefits, create TDRPs, track enrollment for each employee,
track COBRA payments, and use best practices.
To import employee benefit enrollment, create a csv file for
each benefit and click Benefits→Import Employee Benefits. In each
csv file identify the employee by SSN or employee number. Also include the
provider, plan, coverage, employee premium, employer premium and other
information to be imported.
To list, edit, or add benefits, click Benefits→List/Edit
Benefits on the main menu. If you do not see a Benefits item on the
main menu then click Company→Company Settings and click the
checkbox next to Benefits.
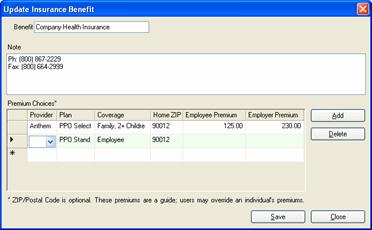
To edit a benefit, double-click it. Instant HR tracks two
types of benefits: Insurance Benefits and Tax Deferred Retirement Plans
(TDRPs). If a benefit is not listed in the Benefits Window, add it by
clicking Add Insurance or Add TDRP. When editing an Insurance
Benefit, a window similar to Figure 16 will open. Table 7 explains the fields in that window.
|
Figure
16. Insurance Benefit
|
Table 7. Insurance Benefit Fields
|
Field
|
Description
|
|
Benefit
|
Benefit name
|
|
Note
|
Details regarding the
benefit
|
|
Provider
|
The name of the provider
that provides the benefit
|
|
Plan
|
The specific benefits and
services provided by a company to its employees
|
|
Coverage
|
The individuals within a
family that are covered under the plan
|
|
Home Zip/Postal Code
|
The employee’s home
Zip/Postal Code
|
|
Employee Premium
|
The dollar amount the
employee contributes for benefits
|
|
Employer Premium
|
The dollar amount the
employer contributes for benefits
|
When adding a TDRP, a window like Figure 17 will open. Table 8 explains the fields in a TDRP. For companies that use graduated matching, enter ceilings and matching rates in Employer Matching.
|
Figure
17. TDRP Benefit

|
Table 8. TDRP Benefit Fields
|
Field
|
Description
|
|
TDRP
|
Tax Deferred Retirement
Plan Name
|
|
Company Account #
|
The TDRP group account
number for the company
|
|
Max Contribution (%)
|
The maximum % salary that
an employee can contribute to their TDRP
|
|
Note
|
Details regarding the TDRP
|
|
Employer Matching
|
The graduated rate that the
employer contributes to the employee’s TDRP account as a percent of the
employee’s contribution
|
|
Up to (%) and Rate(%)
|
The Employer Matching table
is a graduated table, similar to an income tax table, that defines the rate
that the employer matches an employee contribution. In Figure 17, if an employee would contribute 15% of his salary to his 401(k) then the employer would match 50% of the first 5% (2.5%), 25% of the next 5%(1.25%), and none of the last 5% (0). The employer would contribute 3.75% (2.5%
+ 1.25% + 0) of the employee’s salary.
|
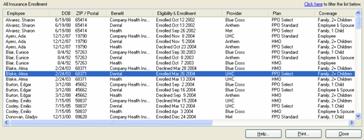
To select an Insurance Benefit and change the enrollment
for several employees from one window, click Benefits→Insurance
Enrollment Matrix. A window similar to Figure 18 will open. Double-click a specific employee to edit his enrollment information. A window similar to Figure 19 on the next page will open. Check the eligibility and enrollment dates that apply.
|
Figure 18. Insurance Enrollment Matrix
|
Once the provider, plan, and coverage are specified, click
the Look Up Premiums button to view matching premiums for all employees
with similiar coverage.
It is possible to override premiums by directly editing the
amounts. To open a benefit and either rename it or change the premium schedule
for everybody, click the name of the benefit in the upper left corner of the
window, which is “Dental” in Figure 19 on the next page.
Figure 19. Employee Benefit Screen
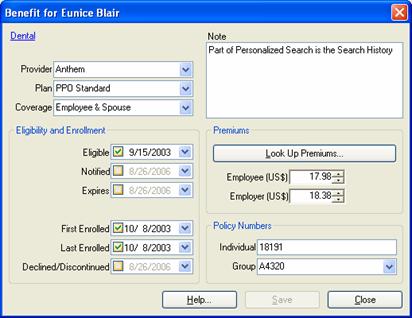
Table 9. Fields for Employee Benefit Enrollment
|
Field
|
Description
|
|
Coverage
|
Varies by benefit. Usually
employee, employee and spouse, or family.
|
|
Note
|
Details regarding the
benefit
|
|
Individual Policy Number
|
Each benefit can also have
a group policy number.
|
|
Eligible
|
Date the employee is
eligible. Not checked if not applicable. Raises an Employee Eligible for
Benefit reminder. To enable or
disable a reminder, click Tasks→Enable/Disable Reminders.
|
|
First Enrolled
|
Date the employee first
enrolled. Not checked if not enrolled.
|
|
Last Enrolled
|
Date the employee last
enrolled. Usually the same as the date first enrolled. Not checked if never
enrolled.
|
|
Declined
|
Date employee declined
benefit. Not checked if not declined.
|
To select a TDRP Benefit and change the selections for
several employees from one screen, click Benefits→TDRP Enrollment Matrix.
A window similar to Figure 20 will open. Double-click on a specific employee to edit his TDRP enrollment information.
Figure 20. TDRP Enrollment Matrix

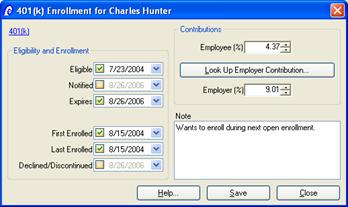
When you open an employee’s TDRP enrollment, you will see a
window that is similar to Figure 21. Check the eligibility and enrollment dates. Enter the maximum percentage and Select Look Up Employer Contribution to set how much the employer should contribute to the TDRP based on the employee contribution
table. To edit the employer’s matching rates, click on the TDRP benefit in
the upper left corner which is “401(k)” in Figure 21.
|
Figure 21. Employee TDRP Enrollment Screen
|
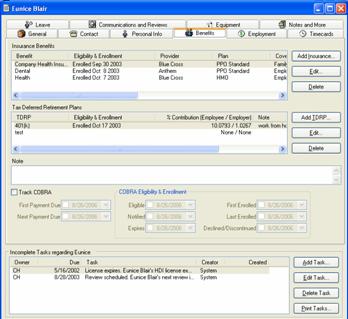
Each employee has a benefits tab that lists eligibility
and enrollment. Double-click a benefit to see an employee’s provider, plan,
and coverage -- or look up premiums information.
|
Figure
22. Employee Benefit Enrollment Tab
|
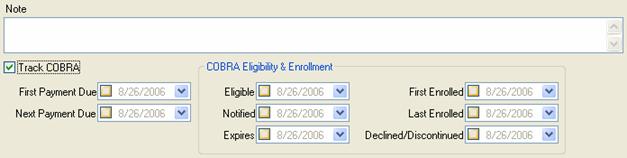
Once an employee is terminated it is possible to track COBRA
dates and premiums owed but not payments. Open the employee and click the
Employee Benefits tab. Check the Track Cobra box. Alternatively, click
on Benefits→Enroll Employee in COBRA on the main menu. Or, when
terminating an employee, check the Enroll in COBRA checkbox. You can then track
important dates such as eligibility, enrollment, notification, and termination.
Create Benefit Reports by clicking Reports→Benefits
on the main menu. Table 10 summarizes the reports below.
Table 10 Benefits Reports
|
Report
|
Description
|
|
Benefit Enrollment for One
Employee
|
Lists all insurance benefit
plans and TDRPs for a specific employee. Includes information such as
provider, plan, eligibility, enrollment, policy numbers and premiums.
|
|
Cobra Enrollment
|
Lists all employees
enrolled in COBRA as well as their premium costs, payment due dates, and the
active benefits they are currently receiving.
|
|
Insurance Enrollment Matrix
|
A static screen of open
enrollment for all employees at the same time. Enrollment criteria based on
type of benefit, provider, plan, coverage, zip code, and/or date of birth.
|
|
TDRP Enrollment Matrix
|
Employee, eligibility,
enrollment, and contribution information for TDRPs.
|
|
Premium Schedule
|
A list of schedule benefits
for all the premiums.
|
|
Total Premiums for Each
Employee
|
Lists total premiums for
each employer plan so employers and employees know how much they owe providers
each pay period.
|
|
Total Premiums for Each
Provider/Plan
|
Lists amounts due to the
provider each pay period for plan coverage.
|
Apex recommends the following practices:
Use the Company Setup Wizard to define your benefits before you
add a single employee. To open the wizard, click Company→Set Up Company
on the main menu. Alternatively, you can set up benefits by clicking Benefits→List/Edit Benefits.
Store copies of benefit policies and completed enrollment
forms in the benefits and employee folders. Section 3.3 on page 10 explains how to enable folders.
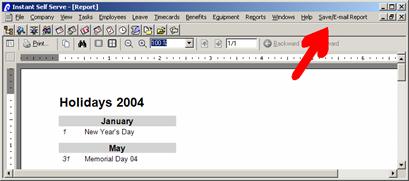
To list available reports, click Reports on the main
menu. After you run a report, a menu item labeled Save/E-mail Report will appear as shown
in Figure 24. To save or e-mail a report, click Save/E-mail Report.
The system can save the report in any of the following formats: HTML, Tiff, PDF, MS Excel, text and RTF.
Figure 24. Save/E-mail Report Menu Item
Tabular
Reports contain a row for each employee and several columns. A
roster is an example of a Tabular Report. To create or edit Tabular Reports,
click Report→Custom Tabular Reports.
Table 11 lists reports that are directly accessible by clicking Reports on the main menu. Tables proceeding Table 11 list reports that are accessed by clicking submenus under Reports.
The windows that filter many reports show a hyperlink that
is labeled, “Show employees where Status=Active”. To change which employees are
included on the report, click the hyperlink. Click the Advanced button
to filter employees by more than one criterion. The Advanced button also
allows you to save the criteria so that they can be used in other reports.
Table 11. Reports Opened by Clicking Reports on Main Menu
|
Report
|
Description
|
|
Tasks and Reminders
|
List of manually scheduled
tasks and automatically generated reminders
|
|
Employee Profile
|
Profile one employee. Configurable
report that combines several lists like completed training and emergency
contacts into one report.
|
|
Immigration
|
List of people grouped by
immigration status. Highlights people whose Visas are about to expire.
|
|
Equipment
|
List of equipment, filtered
by check in/out status.
|
Table 12. Reports Opened by
Clicking Reports→Employee Detail
|
Report
|
Description
|
|
Attendance History for
Employee
|
Itemizes leave and
tardiness history for one employee. Filters by date range and type of leave.
Optionally shows earned leave.
|
|
Benefit Enrollment for
Employee
|
Lists benefits in which a single
employee is enrolled.
|
|
Communications regarding
Employee
|
Lists communications
regarding one employee. Filters by date range. Also available as part of the
Employee Profile report.
|
|
Compensation History for
Employee
|
Lists compensation history
for one employee. Filters by date range. Also available as part of the
Employee Profile report.
|
|
Education and
Certifications for Employee
|
Lists education and
certifications for one employee. Also available as part of the Employee
Profile report.
|
|
Equipment Checked out by
Employee
|
Lists equipment checked out
by one employee. Same report as Equipment Report.
|
|
Exit Checklist for Employee
|
Exit checklist for one
employee. Also available as part of the Employee Profile report.
|
|
FMLA History for Employee
|
Lists FMLA occurrences for
one employee.
|
|
Immigration Status for
Employee
|
Reports immigration status
and personal information for one employee. Also available as part of the
Employee Profile report.
|
|
Skills for Employee
|
Lists skill levels for one
employee. Also available as part of the Employee Profile report.
|
|
Succession Planning for
Employee
|
Lists succession planning
for one employee.
|
|
Test Results for Employee
|
Lists tests results for one
employee.
|
|
Timecard Summary for
Employee
|
Summarizes timecard entries
for one employee. Also available as part of the Employee Profile report.
|
|
Timecard Detail for
Employee
|
Itemizes timecard entries
for one employee. Also available as part of the Employee Profile report.
|
|
Training for Employee
|
Lists training history for
one employee. Also available as part of the Employee Profile report.
|
|
Union Membership for
Employee
|
Lists union membership for
one employee. Also available as part of the Employee Profile report.
|
Table 13. Reports Opened by
Clicking Reports→Compensation
|
Report
|
Description
|
|
Actual Pay Ranges for
Each Position
|
Lists each position and the
minimum, average, and maximum pay for each year for the last 3 years.
|
|
Compensation for Each
Employee
|
Lists each employee and
their effective compensation. Allows you to include benefit premiums and
bonus ranges.
|
|
Employees Filling Each
Position
|
Lists each position and the
employees who are filling them.
|
|
Positions
|
List of positions, filtered
by position status.
|
|
Position and Compensation
History for Employee
|
Itemizes compensation
history for one employee.
|
|
Salary Table
|
Standard general
schedule-style salary table. Supports annual, biweekly, monthly, and hourly
pay.
|
|
Total FTE and Compensation
for Each Department
|
Lists each department with
committed FTE and compensation.
|
Table 14. Reports Opened by
Clicking Reports→Employment
|
Report
|
Description
|
|
Turnover Summary
|
Lists hires and separations
per month for the last three years. Standard DOL turnover summary.
|
|
List of Terminated
Employees
|
A terminated employee list
|
|
EEO-1
|
Generates site and
headquarters EEO reports. Saves reports as text files that you can submit to
the government.
|
|
Succession Summary
|
Summarizes succession for
each employee.
|
|
Succession Itemization
|
Itemizes succession.
|
|
Count of Active Employees
|
Counts the number of active
employees under each manager, in each department, in each division, and/or at
each location.
|
Table 15. Reports Opened by
Clicking Reports→Benefits
|
Report
|
Description
|
|
Benefit Enrollment for One
Employee
|
Lists all insurance benefit
plans and TDRPs for a specific employee. Includes information such as
provider, plan, eligibility, enrollment, policy numbers and premiums.
|
|
Cobra Enrollment
|
Lists all employees
enrolled in COBRA as well as their premium costs, payment due dates, and the
active benefits they are currently receiving.
|
|
Insurance Enrollment Matrix
|
A static screen of open
enrollment for all employees at the same time. Enrollment criteria based on
type of benefit, provider, plan, coverage, zip code, and/or date of birth.
|
|
TDRP Enrollment Matrix
|
Employee, eligibility,
enrollment, and contribution information for TDRPs.
|
|
Premium Schedule
|
A list of schedule benefits
for all the premiums.
|
|
Total Premiums for Each
Employee
|
Lists total premiums for
each employer plan so employers and employees know how much they owe providers
each pay period.
|
|
Total Premiums for Each
Provider/Plan
|
Lists amounts due to the
provider each pay period for plan coverage.
|
Table 16. Reports Opened by Clicking Reports→Leave Lists and Calendars
|
Report
|
Description
|
|
Leave Itemization and
Summary for One Employee
|
Lists leave history and a
current summary of available leave for one employee.
|
|
Leave Calendar
|
Shows scheduled leave in a
one-month calendar format.
|
|
Scheduled Leave
|
Lists scheduled leave for
any time period.
|
|
Single Leave of Absence
|
Shows the details for a
single leave of absence for one employee.
|
|
Approved/Denied/Pending
Leave Requests
|
Lists requests that meet
any of several criteria.
|
|
Holidays
|
Lists of company holidays.
|
|
Scheduled Recertifications
for Ongoing Conditions, One Month Calendar
|
Shows employees who are
scheduled to recertify their medical condition in a one-month calendar
format.
|
|
Scheduled Recertifications
for Ongoing Conditions, List
|
Lists employees who are
scheduled to recertify their medical condition in for any time period.
|
Table 17. Reports Opened by Clicking Reports→Leave Summaries
|
Report
|
Description
|
|
Accumulated Leave Summary
|
Lists hours of accumulated
leave for a selected list of employees.
|
|
Available Leave Summary
|
Lists hours of available
leave for a list of employees. Available leave accounts for future scheduled
and earned leave.
|
|
Consolidated Leave Summary
|
Lists availability, accrual
rates, used leave totals, and the most recently requested leave for a list of
employees.
|
|
Forfeited Leave
|
Summarizes leave that was
forfeited because it was not used before a limit was automatically applied.
|
|
Incidents Per Month
|
Summarizes the incidents of
leave per month.
|
|
Leave Accrual Summary
|
Summarizes accrual rates
for a list of employees.
|
|
Most Absent Employees
|
Lists the most absent
employees in a department, division, or group.
|
|
Paid/Unpaid Leave Summary
for Payroll
|
Totals paid and unpaid
leave for a fixed period, typically one payroll period.
|
|
Used Leave Summary
|
Summarizes used leave for a
list of employees, departments, or divisions.
|
|
Used Leave Table, Employee
Vs. Time
|
Summarizes used leave for
each employee/month or employee/week.
|
Table 18. Reports Opened by Clicking Reports→Lost Time Analysis
|
Report
|
Description
|
|
Lost Time Analysis for Each
Employee
|
Lists analysis statistics
including annual used leave, Bradford factors, and time lost for a list of employees.
Bradford Factor = #
incidents * # incidents * days absent
|
|
Lost Time Analysis for One
Department
|
Lists analysis statistics
for all the employees in a department.
|
|
Lost Time Analysis for Each
Department
|
Lists analysis statistics
for each department in the organization.
|
|
Lost Time Analysis for One
Manager
|
Lists analysis statistics
for all the employees under a manager.
|
|
Lost Time Analysis for Each
Manager
|
Lists analysis statistics
for each manager in the organization.
|
Table 19. Reports Opened by
Clicking Reports→Timecards
|
Report
|
Description
|
|
List of Holidays
|
Set holidays by clicking Company→Holidays
|
|
Timecard Detail for
Employee
|
Typical timecard for one
employee. Select from a variety of formats.
|
|
Timecard Summary for
Payroll
|
Summarizes time for one
payroll.
|
|
Timecard Summary
|
Pivot table that summarizes
time by employee/month or department/week
|
Table 20. Reports Opened by
Clicking Reports→Certifications
|
Report
|
Description
|
|
Certifications Held by Each
Employee
|
Lists detailed information
for each certificate held by each employee.
|
|
Certifications Held by One
Employee
|
Itemizes all the
certifications that are held by one employee
|
|
List of Employees with
Selected Certification
|
Lists all employees who
hold the specified certification.
|
|
Certifications
Expired/Nearly Expired
|
Lists employees with
certifications that expired or will expire within three months.
|
Table 21. Reports Opened by
Clicking Reports→Training
|
Report
|
Description
|
|
Training History for One
Employee
|
Itemizes all training
completed by one employee
|
|
Training Summary for Each
Employee
|
Summarizes training for a
list of employees
|
|
List People with Selected
Training
|
Lists people who either
began or completed a particular course
|
|
List People without
Selected Training
|
Lists people who have not
completed a particular course
|
Table 22. Reports Opened by
Clicking Reports→Birthdays
|
Report
|
Description
|
|
Birthday Calendar, One Month
|
Shows birthdays on a
one-month calendar.
|
|
List of Birthdays
|
Lists birthdays. Filters by
date range.
|
Table 23. Reports Opened by
Clicking Reports→Scheduled
Performance Reviews
|
Report
|
Description
|
|
Performance Review History
for One Employee
|
Itemizes history for one
employee
|
|
Performance Review Summary
for Each Employee
|
Summarizes past reviews for
a list of employees
|
|
Calendar of Scheduled
Performance Reviews, One Month
|
Shows scheduled reviews for
one month in a calendar format
|
|
List of Scheduled
Performance Reviews
|
Lists scheduled reviews for
any time period
|
Table 24. Minor Reports Opened
by Clicking Reports→Seniority
Anniversaries
|
Report
|
Description
|
|
Birthdays→Birthday Calendar, One Month
|
Calendar of birthdays
|
|
Birthdays→List of Birthdays
|
List of birthdays
|
|
Languages→Bilingual Employees
|
|
|
Languages→List People Who Speak Selected Language
|
|
|
Tardiness→Tardiness for One Employee
|
Enter tardiness by clicking
Leave
|
|
Tardiness→Most Truant Employees
|
Employees with the most
tardiness
|
|
Seniority Anniversaries→Seniority Anniversary Calendar, One Month
|
Calculated from Date
Seniority Begins
|
|
Seniority Anniversaries→List of Seniority Anniversaries
|
|
Use Mail Merge to generate group e-mails, letters and labels.
Mail Merge
involves two steps.
- Create a document with MS Word and insert merge fields.
A merge field
is a place-holder for information that changes from employee to employee. Figure
26 shows a template that contains two merge fields:
one for first name and one for last name.
- Merge the document with the database. Merging will create
one document for each selected employee, replacing merge fields
with actual employee information.
To use Mail Merge, click Employees→Mail Merge. Menu
options similar to Figure 25 will open. Click either Create New Mail Merge Document or Create Mail Merge Document from Existing Document.
Figure 25. Mail Merge Tools

Figure 26. Insert Merge Fields in MS Word
MS
Word will open. Create or edit your document and insert merge fields
as needed. To insert a merge field, click the Insert Merge Fields toolbar
button as shown in Figure 26. After you complete the document, save and close it.
Whenever you need to merge the MS Word document with the database,
click Merge Document as shown in Figure 25. The system will ask you to select the document and the employees or FMLA request that you want to merge. It will then create one document for each selected employee, replacing merge fields with actual employee
information.
Tasks and reminders empower you to stay organized and hold
employees accountable. You create tasks. The system automatically creates
reminders. This chapter explains tasks and reminders, how to manage them, and
best practices for using them.
To create a task, click Task→Add on the main
menu. Figure 27 shows a single task. Table 25 explains each field in Figure 27. To create a recurring task, click Recurring.
|
Table 25. Fields in a Task
|
Field
|
Description
|
|
Owner
|
Responsible for
completing the task by the due date. The owner can be set to any active
employee.
|
|
Regarding
|
Who the task regards.
|
|
Task
|
Explanation of what needs
to be done.
|
|
Due
|
When task is due.
|
|
Completed
|
Only check the completed
field if the task is done.
|
|
Urgent
|
Urgent tasks appear
before non-urgent tasks in lists.
|
|
Figure
27. Task
|
To manage your tasks, click Task→List on the
main menu. By default, the window will list all of the tasks that you own. From
this window, you can filter, sort, print, add, edit and delete tasks. You can
also open the people that the tasks regard.
To filter tasks, change the Owner, Regarding, Status or Creator fields. The window will refresh
and list only the tasks that meet all of your criteria. To sort tasks, click
one of the column headers like Owner or Due.
The system can automatically raise reminders based on
various employee dates. These reminders appear on task lists until something is
done to lower them. The tables on the next page list all of the reminders. To
change how the system raises reminders, click Company→Options on
the main menu.
Table 26. Reminders Regarding Benefits
|
Reminder
|
Description
|
|
Employee Eligible for
Benefit
|
Reminds you that an
employee has become eligible for a benefit. Lowers after a date is entered in
the Enrolled or Declined
fields.
|
|
COBRA Expires
|
Reminds you that an
employee’s COBRA is about to expire. Lowers after a date is entered in the Discontinued field.
|
Table 27. Reminders Regarding
Leave
|
Reminder
|
Description
|
|
Employee Eligible for
Benefit
|
Reminds you that an
employee is eligible for a benefit. The system raises the reminder one week
before Eligible and lowers the alert after you set either Enrolled or Declined.
|
|
COBRA Expires
|
Reminds you that an
employee’s COBRA is about to expire. The system raises the reminder one month
before Expires and lowers it one week after Expires.
|
Table 28. Reminders Regarding Fields on Reviews Tab and
Certifications Tab
|
Reminder
|
Description
|
|
Review Due
|
Reminds you that an employee’s
review is scheduled in the near future. The system raises the reminder one
week before Next
Review and lowers it when you
uncheck Next
Review or set it to a future
date
|
|
Schedule Review
|
Reminds you that no review
is scheduled for an employee. The system raises the reminder when Next Review is not checked and lowers it after you specify Next Review.
|
|
Professional Certification
Expires
|
Reminds you that an
employee’s professional certification is about to expire. The system raises
the reminder one week before Certification Expires and lowers it when you uncheck Certification Expires, set it to a future date, or one month expires.
|
Table 29. Reminders Regarding Immigration, Driver, and
Personal Fields
|
Reminder
|
Description
|
|
Renew I9
|
Reminds you that an
employee’s I9 needs to be renewed. The system raises this reminder one week
before Renew
I9 and lowers it when you
uncheck Renew
I9 or set it to a future date.
|
|
Visa Expires
|
Reminds you that an
employee’s Visa is about to expire. The system raises this reminder one week
before Visa
Expires and lowers it when you
uncheck Visa
Expires or set it to a future
date.
|
|
Passport Expires
|
Reminds you that an
employee’s Passport is about to expire. The system raises this reminder one
week before Passport
Expires and lowers it when you
uncheck Passport
Expires or set it to a future
date.
|
|
License Expires
|
Reminds you that an
employee’s driver’s license is about to expire. The system raises this
reminder one week before License Expires and lowers it when you uncheck License Expires or set it to a future date.
|
|
Driver Insurance Expires
|
Reminds you that an
employee’s driver’s insurance is about to expire. The system raises this
reminder one week before Insurance Expires and lowers it when you uncheck Insurance Expires or set it to a future date.
|
|
Birthday
|
Reminds you that en
employee’s birthday is near. The system raises this reminder one week before Date of Birth and lowers it two days after Date of Birth.
|
Table 30. Reminders Regarding Leave and FMLA
|
Reminder
|
Description
|
|
Employee Returns from Leave
|
Reminds you that an
employee is scheduled to return from leave. If the duration of the leave was
less than three weeks, then the system raises the reminder on the last day of
leave. Otherwise, the system raises the reminder one week before the last day
of leave. The system lowers the reminder after you check Confirmed Returned as
Scheduled. The system does not
raise the reminder if, according to the employee’s shift, no work days pass
until the beginning of another leave of absence.
|
|
Request Medical
Certification for FMLA Leave
|
Reminds you that an
employee has requested FMLA leave but has not been asked for a medical
certification. The system raises the reminder when neither Requested Certification nor Employer Waived Request for Certification is checked.
|
|
Medical Certification for
FMLA Leave Due
|
Reminds you that an
employee needs to turn in medical certification for FMLA leave. The system
raises the reminder 15 days after Requested Certification and lowers the reminder after you specify First Certified.
|
|
Medical Recertification for
FMLA Leave Due
|
Reminds you that an
employee needs to turn in medical recertification for FMLA leave. Raises when
Recertification
Period has passed since Last Certified. Lowers after Last Certified is updated or Recertification Period is disabled.
|
|
FMLA Request Pending
|
Reminds you that an FMLA
request has neither been approved nor denied. Lowers after the request is
opened and approved and denied.
|
Table 31. Reminders Regarding COBRA
|
Reminder
|
Description
|
|
COBRA Payment Due
|
Reminds you that a COBRA
payment is due. First raises on/after First Payment Due. Lowers after Next Payment Due is entered. Raises again on/after Next Payment Due. Lowers after Next Payment Due is updated. Also lowers on/after Declined or Discontinued.
|
|
COBRA Expires
|
Reminds you that COBRA is
about to expire for an employee. Raises two weeks before Expires. Lowers after Declined
or Discontinued is updated.
|
|
COBRA Notification Due
|
Reminds you that an
employee needs to be formally notified of COBRA eligibility. Raises until Notified is entered.
|
Apex recommends the following practices:
Set company options to generate reminders based on employee
fields. Click Tasks→Enable/Disable Reminders on the main menu, and
click the Reminder Creation tab. With each type of reminder, you can
enable or disable the reminder and specify an owner. The Reminder Creation tab
also explains the fields that are used to raise and lower the reminder.
Create recurring tasks for anything that is not related to
an employee field. Payroll falls into this category. Do not task employee
reviews, Visa renewals, and certification renewals. Instead, enable reminders
by clicking Tasks→Enable/Disable Reminders.
Depending on your familiarity with SQL, the
system offers three ways to export information:
- Run a default Export Interface.
- Customize and run Export Interfaces.
- Directly query the SQL Server database.
Export
Interfaces save information from the database to a delimited
file. To list the available export interfaces, click Employees→Export.
To execute an interface, click it. Table 32 describes the default Export Interfaces.
Table 32. Default Export Interfaces
|
Export Interface
|
Description
|
|
Active Employees
|
Active employees. Contains
dozens of fields including Employee,
EmployeeID, Employee#
and SSN.
|
|
Employees
|
All employees.
|
|
Leave Detail, Current
Payroll
|
Itemized leave entries
during current payroll. Contains the following fields:
EmployeeID, Employee#,
SSN, Employee,
Date, Hrs, Type of Leave, Paid, Used.
Note that Paid is 1 for paid leave and 0 for unpaid leave. Used is 1 for used leave and 0 for earned leave. Hrs is positive for used leave and negative for earned
leave.
|
|
Leave Detail, Last Payroll
|
Itemized leave entries for
last payroll.
|
|
Timecard Detail, Current
Payroll
|
Itemized timecard entries
for current payroll. Contains the following fields:
EmployeeID, Employee#,
SSN, Employee,
Clock In, Clock Out,
Hrs.
Note that Clock In and Clock Out
are date/times. Hrs is the difference
between Clock
In and Clock Out.
|
|
Timecard Detail, Last
Payroll
|
Itemized timecard entries
for last payroll.
|
|
Timecard Summary, Current
Payroll
|
Total hours worked,
summarized by employee. Only includes current payroll. Contains the following
fields: EmployeeID, Employee#,
SSN, Employee,
Regular
Hrs, OT Hrs, Holiday Hrs, Weekend
Hrs, Total Hrs, Regular Rate, OT Rate,
Holiday Rate, Weekend Rate, Pay.
To change overtime or
compensations settings for an employee, open the employee and click his Payroll, Benefits, and
Compensation tab. To change
holidays, click Company→Holidays.
|
|
Timecard Summary, Last
Payroll
|
Total hours worked,
summarized by employee. Only includes last payroll.
|
|
Unpaid Used Leave Summary,
Current Payroll
|
Total unpaid used leave,
summarized by employee. Only includes current payroll. Contains the following
fields:
EmployeeID, Employee#,
SSN, Employee,
Hrs
|
|
Unpaid Used Leave Summary,
Last Payroll
|
Total unpaid used leave,
summarized by employee. Only includes last payroll.
|
If the default interfaces do not meet your needs – and you
are familiar with Structured
Query Language (SQL) – then you can modify the existing
interfaces or create your own. To modify or create new interfaces, click Employees→Export→Customize
Export Interfaces. A window similar to Figure 28 on the next page will open.
|
Figure 29 shows an Export Interface.
Each interface contains a SQL Statement.
When you export, the system executes the SQL Statement
and returns the results as a csv file.
The checkboxes to the left in Figure 29 specify whether the first row in the csv file
will contain headers and whether single words will be surrounded with quotes.
If Show Filter is checked then, when a user exports, the
system will ask the user to select employees. Selected employees are
available in #SelectedPeople.PeopleID
Table 33 lists useful views that can be joined with #SelectedPeople.
|
Figure
28. Export Interfaces
Figure
29. Export Interface
|
By default, a comma separates each field in the csv file.
But you can change the separator to a tab, semicolon, or any other character. After
you create a new Export
Interface and save it, the system will add it to the Company→Export
menu.
If you are familiar with SQL Server databases then you can
directly query the database instead of using Export Interfaces. Table 33 lists useful views.
Table 33. Selected Views
|
View
|
Description
|
|
vwBenefitStandard
|
Selects standard benefits.
|
|
vwBenefitTDRP
|
Selects TDRP benefits.
|
|
vwEmployeeAll
|
Selects all fields for all
employees. Basis for All Employees and Active Employees Export Interface.
|
|
vwEmployeeEEO
|
Selects EEO related
information.
|
|
vwEmployeeLeave
|
Selects denormalized leave
entries. Basis for leave-related Export Interfaces.
|
|
vwEmployeeTime
|
Selects all timecard
entries. Basis for timecard-related Export Interfaces.
|
|
vwEmployeeCompensation
|
Selects denormalized
compensation entries.
|
|
vwEquipment
|
Selects equipment.
|
|
vwPosition
|
Selects positions/jobs.
|
When querying the database, be aware that each employee has
one record in three tables: Person,
PersonX, and Employee. Person and PersonX are joined by
PersonID; PersonX and Employee are joined
by PersonID/EmployeeID. vwEmployeeAll
denormalizes all the fields in all three tables. The database contains several
diagrams that you can use to familiarize yourself with the database schema. Triggers
provide an excellent mechanism for synchronizing data without having to
periodically export anything. Apex periodically releases patches that may alter
stored procedures, views, and existing triggers, but you can safely add your
own objects.
Before you plan and implement security, you need to decide whether
to use Windows
Authentication or SQL Authentication.
- Windows
Authentication. Ideally, if you and all the other users run
Windows NT, 2000 or XP, and you all log in to a domain, then you can fully
integrate security with Windows security. You do not need to add any users
because Instant HR will use the Windows accounts in your domain.
- SQL
Authentication. Otherwise, if you or any of the other users
run Windows 98 or ME – or you all do not log into a domain – then SQL Security
is your only option. You need to add each user.
To change security, click Company→Security. A
window similar to Figure 30 will open.
Figure 30. Permissions for Users, Groups and Roles
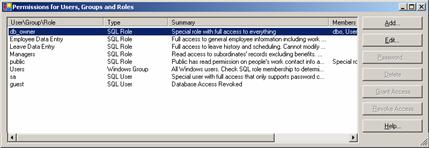
Before you use the Permissions Window in Figure 30, it is helpful to be familiar with the rest of this chapter. The next section defines basic security terms. Next it presents other security considerations and an FAQ. The FAQ explains how to set up common security
scenarios. Finally it documents best security practices.
Use the Permissions Window to create SQL Users
and add existing Windows
Accounts. Then join those users and accounts to SQL Roles.
Finally set permissions on each role.
Table 34 defines these security terms.
Table 34. Security Terms
|
Term
|
Definition
|
|
Permissions Window
|
Figure 30 shows the window. Click Company→Security to open it.
|
|
Windows Account
|
Only applies to Windows Authentication. Includes any Windows user or group. Named in the
format [Domain or Computer]\[user]. Examples include hqdomain\fred and workstation1\sue. To add Windows accounts to a domain, use
Microsoft’s Active
Directory Users and Computers
tool. To add accounts to a local computer, use Computer Manager. Windows Accounts cannot be added from iHR.
|
|
SQL User
|
Applies to SQL Authentication. Each user who cannot use Windows Authentication must be added as a SQL User. To add a SQL User,
click the Add button on the Permissions Window.
Table 37 lists special
built-in SQL
Users that cannot be deleted.
|
|
Term
|
Definition
|
|
SQL Role
|
Applies to both SQL and Windows Authentication. Groups SQL Users
and Windows
Accounts. Instead of setting
permissions on each user, usually you create a role for each type of user,
join users to those roles, and then set permissions on each role. To add a SQL Role, click the ADD button on the Permissions Window. Table 35 lists common SQL Roles that Apex created for you. Table 36 lists special SQL Roles that cannot be deleted and that come with SQL Server.
|
|
R---
RW--
RWC-
RWCD
|
When you open a user, role
or account and click the Permissions tab, you will see these terms. They are abbreviated permissions. R =
Read. W = Write. C = Create. D = Delete.
|
The software comes with three common SQL Roles
that you can use, edit or delete to meet your needs. Table 35 lists those common roles.
Table 35. Common SQL Roles
|
Common SQL Roles
|
Description
|
|
Employee Data Entry
|
Members of this role are
responsible for entering new employees. You can change permissions, but, by
default, members can access and change everything except compensation.
|
|
Leave Data Entry
|
Members of this role are
responsible for scheduling leave. You can change permissions, but, by
default, members can access everyone’s leave.
|
|
Managers
|
Members of this role can
access non sensitive information about their subordinates. You can change permissions,
but, by default, members can access everything about their subordinate’s
except for benefits and compensation.
|
All SQL Server installations provide built-in roles that
cannot be deleted. Table 36 lists those special roles.
Table 36. Build-in SQL Roles
|
Special SQL Roles
|
Description
|
|
db_owner
|
Members of this role have
full access to everything.
|
|
public
|
Everyone is always a member
of this role. You can change permissions, but, by default, everyone can view everyone
else’s work contact information and scheduled leave. Everyone can view their
own personal contact information.
|
All SQL Servers provide built-in users that cannot be
deleted.
Table 37 lists those special users.
Table 37. Built-in SQL Users
|
Special SQL Users
|
Description
|
|
sa
|
This user has full access
to everything.
|
|
guest
|
Advanced. If InstantHR is the only database running on your SQL Server, as is the case with a typical installation, then
you do not need to know about guest.
Otherwise, consult your SQL Server
documentation.
|
When the system checks if a user is authorized to do
something, it looks at all of the permissions for every role to which that user
belongs. If any of the roles can do it then so can the user. Effective
permissions are the sum of all the permissions for a user and the roles to
which he belongs.
|
For example, suppose Tim is a member of the Managers
and Leave Data
Entry roles as shown in Figure 31, and permissions are set according to Table 38. Will the system let Tim change someone’s leave accrual? Table 38 shows that even though the permission on Tim’s account (hq/tim) is set to none, the permission on Leave Data Entry
is set to write. And, because Tim is a member of Leave Data Entry,
Tim will be able to change anyone’s accrual. Note that Tim, and every other
authenticated user, inherits the permissions that are set on the special
role, public.
|
Figure
31. SQL Role Membership
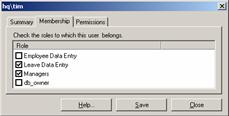
|
|
Table 38. Effective Permissions Example
|
User/Account/Role
|
Leave Accrual
Permission
|
|
hq/tim
|
None
|
|
Managers
|
Read
|
|
Leave Data Entry
|
Write
|
|
public
|
None
|
In Table 38, hq/tim is a member of Managers
and Leave Data
Entry. The table makes it look like Tim cannot change anybody’s
leave accrual, but he can. Because Tim is a member of Leave Data Entry,
and Leave Data
Entry has write permission on Employee Leave Accrual (Figure 32), Tim also has write permission on leave accrual.
|
Figure
32. Permissions on Leave Data Entry
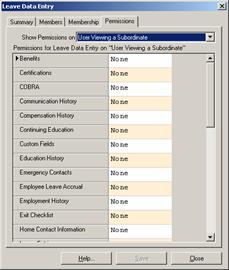
|
If you open the common Leave Data Entry from the Permissions Window
– and you click the Permissions
tab – then a window similar to Figure 32 will open. Notice the Show Permissions on
select box that is set to User Viewing Any Employee. That select box provides seven
choices:
- Supporting Information
- User Viewing Any Employee
- User Viewing Self
- User Viewing a Subordinate
- User Viewing an Employee in User's Division
- User Viewing an Employee in User's Department
- User Viewing an Employee at User's Location
All of the User Viewing choices are scopes. When
the system determines effective permissions, it considers the employee who the
user is trying to view. If the employee is the user’s subordinate, then the
system considers all of the permissions set for the User Viewing a Subordinate
scope. Likewise, if the employee and the user are in the same department, then
the system considers all of the permissions for the User Viewing an Employee
in User’s Department scope.
|
Q:
A:
|
How do I set permissions on a Windows user or Windows group?
Click Company→Security. Click Add and enter
the user or group. Next, either click the Membership tab and join the
Windows account to one or more SQL Roles or click the Permissions
tab and set permissions.
|
|
Q:
A:
|
How do I allow an assistant to enter new employees without
letting the assistant see compensation and benefits?
By default, the Employee Leave Entry role grants
access to everything except compensation and benefits. To join an assistant
to that role, click Company→Security. Double-click the
assistant, click the Membership tab, and check Employee Leave Entry.
If the assistant is not listed, then click Add and add his account.
|
|
Q:
A:
|
How do I allow an assistant to enter scheduled leave
without letting the assistant see sensitive information?
By default, the Leave Data Entry role grants write
permission for everybody’s leave. To join an assistant to that role, click Company→Security.
Double-click the assistant, click the Membership tab, and check Leave
Data Entry. If the assistant is not listed, then click Add and add
his account.
|
|
Q:
A:
|
How do I grant managers access to their subordinates’
information?
By default, the Managers role grants read permissions
for subordinates’ information, excluding compensation and benefits. To join a
user to that role, click Company→Security. Double-click the
user, click the Membership tab, and check Managers. If the user
is not listed, then click Add and add his account. Note that, to set
permission for subordinates’ information, click any user/group/role, click the
Permission tab, and select the scope, User Viewing Subordinates.
|
The software does not secure Windows folders. Employee
folders which are rooted in the HR folder are not automatically secured. You should
use Windows Explorer
to secure them. Consult Windows Help for information on setting folder security.
The database is physically stored in two files, iHR_data.mdf and iHR_log.ldf.
Unauthorized users should not be able to access the .mdf and .ldf data files on your database server. A
user could copy those files to another computer, install SQL Server,
reattach the files, and gain unrestricted access to your database. Note that a
user can still access the database without being able to access the .mdf and .ldf data files.
Likewise, unauthorized users should not be able to access database backup
files.
Apex recommends the following practices:
- Secure your database by removing the Window group, Users,
from the db_owner role.
- Change the sa password. By default, the password is
instant.
- Do not set permissions on individual users. Instead,
create roles for each type of user, set permissions on those roles, and then
join users to those roles.
- Think twice before joining roles to other roles. Effective
permissions can be tricky. Nested roles make it next to impossible to
figure out effective permissions.
- Religiously update the summary for a user/account/role
whenever you change permissions. The summary should describe effective
permissions.
To back up your database, open the software and click Company→Backup.
If you back up the database to a shared folder then you may experience
difficulties. By default, SQL Server runs under a local system account. The local
account may not have permission to write to shared folders. To back up to a shared
folder, change the login account for SQL Server by following the procedure
below.
- Log on to the computer that hosts SQL Server.
- Right-click My Computer.
- Click Manage.
- Click and expand the Services node.
- Double-click the service, MSSQLServer.
- Click the Logon tab.
- Change the logon to an account that has access to both the
shared folder and the local SQL Server mdf/ldf files which are usually located in
the folder, C:\Program
Files\Microsoft SQL Server\MSSQL\Data.
If you run SQL Server 2000 and you want to
automatically back up your database then Apex recommends that you use SQL Server Agent
and SQL Server Job
Scheduling Wizard; consult your SQL Server documentation for details.
Otherwise, if you use the desktop version of SQL Server (MSDE) that
comes with Instant
HR then follow the instructions in the next sections.
To automatically back up your database using MSDE,
create a scheduled task on the database server and copy/paste a SQL command.
1. Create
a scheduled task. From the server’s desktop, click Start→All Programs→System
Tools→Scheduled Task. (Note that the directions are specific to a
standard Windows XP installation. If you are using a different operating system
then you may need to use Windows Help to find your Scheduled Tasks folder.)
Next, right-click a blank area and click New Task. Double-click the
task.
2. In
the Run text box, copy/paste one of the SQL commands below:
OSQL -E –S.\IHR –Q"BACKUP
DATABASE InstantHR TO DISK='db.bak'"
OSQL -Usa –S.\IHR –Ppwd
–Q"BACKUP DATABASE InstantHR TO DISK='db.bak'"
Use the first command if
you are logged on as an administrator to a computer running Windows XP, 2000 or
NT. Otherwise use the second command. If you use the second command then change
pwd to
your actual sa
password. (Note that, with the second command, anyone with permission to read
scheduled tasks on the server will be able to see your sa
password.) Change db.bak
to a valid, shared path on a different computer.
3. If
you see a Run As
text box then type the name of a Windows account that has administrative
permission on the database and write permission on the backup destination.
Click through the remaining tabs and verify the settings. Finally save the
scheduled task.
Windows Scheduler will overwrite the
backup file every time it runs. To keep more than one backup, schedule multiple
tasks that run on different days within the same period. For example, you could
schedule 5 tasks that run weekly; one on Monday, one on Tuesday, one on Wednesday,
one on Thursday, and one on Friday; and then change the destination path for
each task to be something like \\backup\InstantHRmon.bak,
\\backup\InstantHRtue.bak
…
Everyone who can access your backup file can copy the file
and restore it on another computer, thereby gaining access to all your HR
information. Avoid this security hole by restrictively setting read permission
on your backup folder. If you specify the sa password in your scheduled task then
be aware that members of the local Administrators, Backup Operators,
and Server
Operators groups will be able to see the password and gain
unrestricted access. Avoid this security hole by restrictively setting group
membership.
If your organization runs SQL Server 2000 then skip to section
13.3.2. Otherwise, continue reading section 13.3.1.
To restore a backup using MSDE, log on to your database server.
Open a command window, usually by clicking Start→Programs→Accessories→Command
Prompt. Type one of the following commands:
OSQL –E –S.\IHR
–Q"RESTORE DATABASE InstantHR FROM DISK='db.bak'"
OSQL -Usa –S.\IHR –Ppwd
–Q"RESTORE DATABASE InstantHR FROM DISK='db.bak'"
Use the first command if you are logged
on as an administrator to a computer running Windows XP, 2000 or NT.
Otherwise use the second command. If you use the second command then change pwd to your
actual sa
password. Change db.bak
to your actual backup file. Warning: If your database already exists then the
above commands will overwrite it without warning.
If you receive an error like “osql is not recognized” then MSDE is not
installed. Navigate to the MSDE
folder in the setup directory and run setup.exe
To restore a database using Enterprise Manager
that comes with SQL
Server 2000, log on to your database server. Click Start→Programs→Microsoft
SQL Server→Enterprise Manager. A window will open that is similar to Figure
33 on the next page.
To restore, follow the procedure below.
- Click the server node to open it.
- Right-click Databases.
- Click All Tasks.
- Click Restore Database and a window similar to Figure
34 will open.
- In the Restore as database field type InstantHR
- Click the radio button labeled From device
- Click the button labeled Select Devices
- Browse to the database file. For a new setup, the file
will be in the setup folder at Database/iHR.bak
- Click OK to return to Figure 34.
- Click the tab labeled Options.
- The database contains two logical files as shown in Figure
35. Verify the paths in the column labeled Move to physical file name. The folder that will contain the files must exist on your server.
- Click OK to return to Figure 34. Click OK to restore the database.
If you receive any errors then return to the Options
tab shown in Figure 35 and verify the file names. The file names should be something like C:\MSSQL\Data\InstantHR.mdf and
C:\MSSQL\Data\InstantHR.ldf
|
Figure
33. Restoring a Database with Enterprise Manager
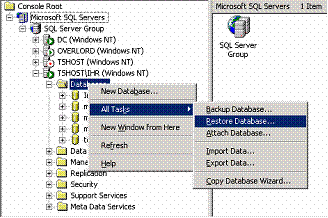
Figure
34. Restore Database Window
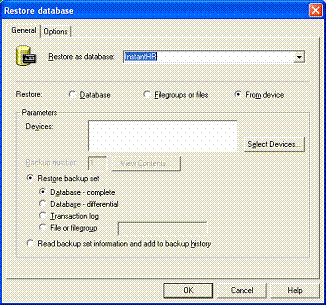
Figure
35. Restore Database Options
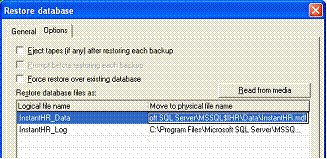
|